This won't help if you have an actually bent rotor, like if someone backed a car into it. I'd say a rule of thumb is if you can see the disk's problem without spinning the wheel, this probably won't work. But hey, it's already broken, so why not give it a go. If you've got a dial indicator, crescent wrench, BFS (Big Frigging Screwdriver) and about 100lbs of dead weight, you're good to go.
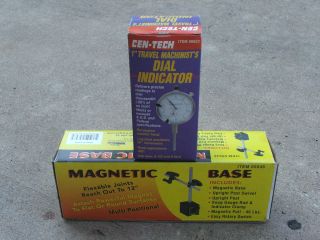
First is to set up for measuring the disk runout (aka wobble, 'not spinning straight', etc). You'll want to find the 'high' and 'low' spots in the rotor, otherwise known as 'out' and 'in'. We're talking about very small amounts here, so there's not really a substitute for the right tool, a dial indicator. Now it doesn't have to be a really great one. This example of fine Chinese craftsman shipment works just fine.
The base isn't so much for magnetic as it is for heavy. You can kludge your own together, but it was cheap, so what the heck. We're saving so much by not buying a rotor...
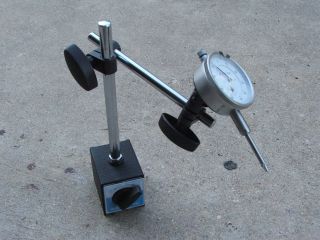
Here's what it should look like all together.
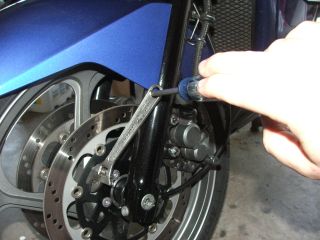
Place the indicator so it's perpendicular to the rotor's braking surface. If you're doing the front wheel, put sufficient dead weight (or a compliant helper) on the pillion to lift it. If you've got another way to lift the front, that's ok too. Main thing is that the bike needs to be STEADY while you're measuring. Rotate the wheel to find the high and low spots. Mark these if you wish. I find it helpful to do so, but it's probably not necessary.
NOTE: I tried the old bicycle wheel truing trick of using a piece of chalk to find the high and low spots, but the amounts of runout we're measuring here are so small I couldn't get it to work. Just buy the tools. They're cheap.
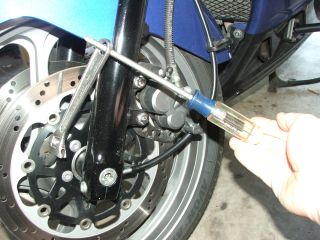
Once you've found the high and low spots using the dial indicator, it's time for some Bruce Force! Er, Brute Force! You DO NOT want to try to adjust the rotor runout by putting the crescent wrench on the rotor. It might work for pedal bikes, but you'll just stand a good chance of mucking up the Conc's rotors. You gotta take the indirect approach. It's actually very similar to truing pedal bike wheels. You adjust the spokes that hold the wheel, in our case the rotor, to get it straight. For a bike, it's twisting nipples to set the spoke tension (settle down guys), but on a motorcycle you 'twist' the rotor carrier spokes in and out to get the rotor where you want it.
If it's too far outboard, you bend the rotor in. To do this, place an adjustable wrench (aka Crescent) on the spoke. Using the BFS twist the wrench in the direction you need the rotor to go.
Here's what adjusting 'out' should look like.
Here's 'in'.
It doesn't take LOTS of 'BF' to adjust the runout, so take your time. If you go too far, just go back a little.
You can get it to just about perfect with a little patience, but the spec is <0.15mm, or just under 0.006”. I target for inside 2mils, which is about what the surface roughness of my rotors is anyway, so trying to get it closer won't work.
So what's the advantage? Better brake pad wear for one. I think that some of the grip vibration I felt at one time lessened a bit after fixing a pretty grossly warper rotor. Of course, there's always the advantage of saving the $100's on brake rotors for other things.
BTW, if you're looking for something, please give the Concours Owner's Group Industry Members the first crack at it. I've never been disappointed with any of 'em I've dealt with.